Repositioning Closed Captions
By default, MovieCaptioner puts your captions at the bottom of your movie. If using QT Text captions, your choice is either below the movie, where it doesn't interfere with the movie at all, or you can have them overlaid over the lower portion of the movie either with a black background or with a 50% translucent background. What do you do, however, if you have a movie that has some content at the bottom, such as a lower third (speaker's name and title for instance) or some other content that you don't want covered? Again, you have 2 choices. One would be to use Sonic Scenarist (SCC) captions. These are the same type you see on TV and are supported by Apple's iTunes. The other choice would be to stick with QT Text captions, but do a little manual manipulation. Let's look at each.
Sonic Scenarist (SCC) Captions
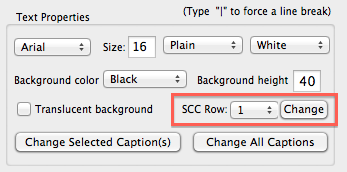
Using both SCC caption and QT Text captions, you will need QuickTime 7 Pro ($30 upgrade to QuickTime 7 Player from Apple). With the SCC captions, you can place the captions on one of 15 rows. Again, by default, MovieCaptioner puts these captions at the bottom of the movie in Row 15. If a caption is longer than one row, it will automatically bump the caption up a row for as many as it needs to fit the caption in. SCC captions can be up to 4 lines each and no more than 32 characters per line. So, if you have a caption that is 3 rows long, it will automatically bump the starting line up to Row 13. To set a caption to Row 1, for example, all you need to do is to change the SCC Row pulldown menu to the row you want them to start, then click the Change button next to it. You may start any caption on any row, unlike QTText captions which have to be the same throughout the movie.
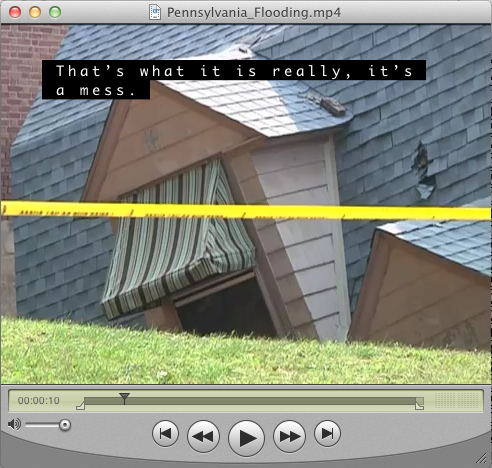
Here is what the SCC caption will look like on Row 1 (and it wraps to Row 2 as well)...
A little gotcha to remember when exporting as Sonic Scenarist (Embedded SCC) captions from MovieCaptioner is that once the captions are added to the movie, you must remember to Save the QuickTime movie before closing the QuickTime Player window. For some reason, QuickTime will not warn you to save your movie with the SCC captions and they will be lost if you just close the QT Player window. You'll have to re-export from MovieCaptioner to get them back in. SCC captions also require the ClosedCaptionImporter.component plugin (free from Apple).
QuickTime Text Captions
QT Text captions have been a capability of QuickTime for a long time. They also require you to have QuickTime 7 Pro to add the captions to your movie. No special plugin is needed, however. The process of creating and adding QT Text captions to a movie can be very tedious if you do it manually, but luckily, MovieCaptioner makes this a snap. Just by choosing Embedded QuickTime from the Export menu in MovieCaptioner your project will create the QuickTime Text file and add it to your movie right before your eyes. An additional export option is Embedded QuickTime (Unicode), which writes an XML file instead of a QT Text file and embeds that into the movie. The advantage of the XML format gives you more support for special characters with accents, especially Asian characters. The down side is that they do not wrap naturally, so you'll need to add line breaks (type the bone "|" character) where you want the lines to break.
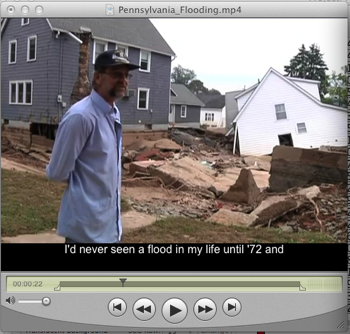
Here is what Embedded QuickTime captions would look like below the movie...
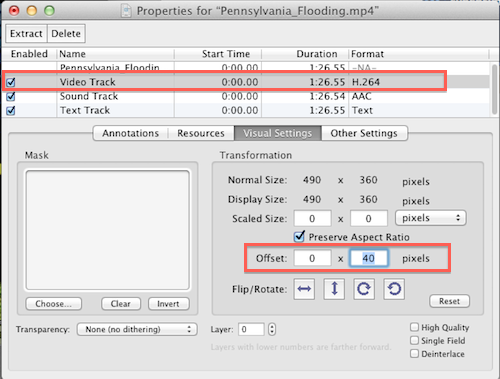
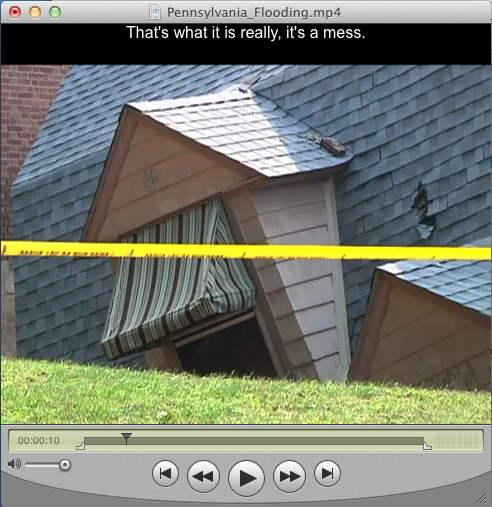
To move these captions to the top of the movie, you will need to go to the Movie Properties window in QuickTime Pro after adding your captions. Click the Text Track to select it, then click the Visual Settings tab in the middle of that window. Change the vertical offset to 0 and the captions will jump to the top...
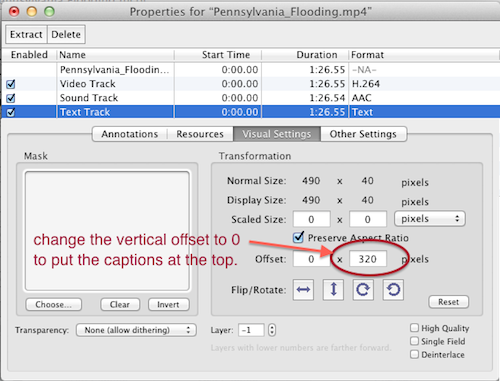

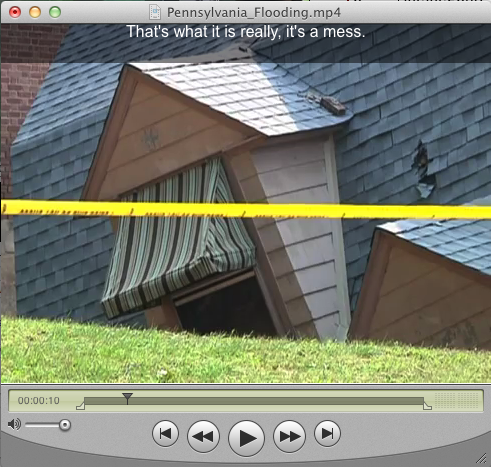
Now, if you want the captions to truly be above the movie (not overlapping it as in the screenshot above), you will need to apply this last step to the movie's Video track as well. If you'll notice in the Movie Properties window above, the text track in this case is 40 pixels tall. This is how much we need to offset the movie's Video Track. So, select the Video Track, then in the Visual Setting tab we are again going to change the vertical offset. In this case it will be 40 to line up with the bottom of the Text Track.
Movie is now entirely below the captions. Notice how you can see more of the roof above the window gable as compared to the screenshot above...
You can also do this with the Translucent Background setting checked in the Text Properties area of MovieCaptioner. Instead of an opaque colored background, you'll get a 50% black background that overlaps the movie. This keeps the movie's aspect ratio the same and at the same time you can see the movie behind the text. The difference in using the translucent background would be that you have two Text Tracks to offset (set both to 0) instead of one as above. The translucent background is actually just a text track with no text and the background set to 50% transparent. The white text is overlaid on the translucent background so the text stays solid and is more readable than if it were transparent also. You would not move the Video Track in this case. Just leave the translucent background and text overlay the movie.
Notice how you can see the shingles of the house through the caption's background and the text is still very readable.
I hope this helps you understand a little about repositioning closed captions. It's not too hard and it will go a long way in some cases to keep your movies accessible while retaining the content below them.
Please try MovieCaptioner to make your movies accessible. You can download a free 14 day demo. Also, there is now a Windows version as well.
Sonic Scenarist (SCC) Captions
Using both SCC caption and QT Text captions, you will need QuickTime 7 Pro ($30 upgrade to QuickTime 7 Player from Apple). With the SCC captions, you can place the captions on one of 15 rows. Again, by default, MovieCaptioner puts these captions at the bottom of the movie in Row 15. If a caption is longer than one row, it will automatically bump the caption up a row for as many as it needs to fit the caption in. SCC captions can be up to 4 lines each and no more than 32 characters per line. So, if you have a caption that is 3 rows long, it will automatically bump the starting line up to Row 13. To set a caption to Row 1, for example, all you need to do is to change the SCC Row pulldown menu to the row you want them to start, then click the Change button next to it. You may start any caption on any row, unlike QTText captions which have to be the same throughout the movie.
Here is what the SCC caption will look like on Row 1 (and it wraps to Row 2 as well)...
A little gotcha to remember when exporting as Sonic Scenarist (Embedded SCC) captions from MovieCaptioner is that once the captions are added to the movie, you must remember to Save the QuickTime movie before closing the QuickTime Player window. For some reason, QuickTime will not warn you to save your movie with the SCC captions and they will be lost if you just close the QT Player window. You'll have to re-export from MovieCaptioner to get them back in. SCC captions also require the ClosedCaptionImporter.component plugin (free from Apple).
QuickTime Text Captions
QT Text captions have been a capability of QuickTime for a long time. They also require you to have QuickTime 7 Pro to add the captions to your movie. No special plugin is needed, however. The process of creating and adding QT Text captions to a movie can be very tedious if you do it manually, but luckily, MovieCaptioner makes this a snap. Just by choosing Embedded QuickTime from the Export menu in MovieCaptioner your project will create the QuickTime Text file and add it to your movie right before your eyes. An additional export option is Embedded QuickTime (Unicode), which writes an XML file instead of a QT Text file and embeds that into the movie. The advantage of the XML format gives you more support for special characters with accents, especially Asian characters. The down side is that they do not wrap naturally, so you'll need to add line breaks (type the bone "|" character) where you want the lines to break.
Here is what Embedded QuickTime captions would look like below the movie...
To move these captions to the top of the movie, you will need to go to the Movie Properties window in QuickTime Pro after adding your captions. Click the Text Track to select it, then click the Visual Settings tab in the middle of that window. Change the vertical offset to 0 and the captions will jump to the top...
Now, if you want the captions to truly be above the movie (not overlapping it as in the screenshot above), you will need to apply this last step to the movie's Video track as well. If you'll notice in the Movie Properties window above, the text track in this case is 40 pixels tall. This is how much we need to offset the movie's Video Track. So, select the Video Track, then in the Visual Setting tab we are again going to change the vertical offset. In this case it will be 40 to line up with the bottom of the Text Track.
Movie is now entirely below the captions. Notice how you can see more of the roof above the window gable as compared to the screenshot above...
You can also do this with the Translucent Background setting checked in the Text Properties area of MovieCaptioner. Instead of an opaque colored background, you'll get a 50% black background that overlaps the movie. This keeps the movie's aspect ratio the same and at the same time you can see the movie behind the text. The difference in using the translucent background would be that you have two Text Tracks to offset (set both to 0) instead of one as above. The translucent background is actually just a text track with no text and the background set to 50% transparent. The white text is overlaid on the translucent background so the text stays solid and is more readable than if it were transparent also. You would not move the Video Track in this case. Just leave the translucent background and text overlay the movie.
Notice how you can see the shingles of the house through the caption's background and the text is still very readable.
I hope this helps you understand a little about repositioning closed captions. It's not too hard and it will go a long way in some cases to keep your movies accessible while retaining the content below them.
Please try MovieCaptioner to make your movies accessible. You can download a free 14 day demo. Also, there is now a Windows version as well.


Patrick - you are the captioning guru. Thanks for all the good info.
ReplyDeleteThank you. Glad it was helpful!
ReplyDeleteIts a nice blog....thanks for all good info
ReplyDeleteicaption that
thank you avneet. I hope to find time to add more in the future.
ReplyDelete