How to Create Open Captions for Your Movie
First of all, let me explain the difference between closed captions and open captions. Closed captions can be toggled on and off, while open captions are on all the time. Simple and straightforward.
Update: Apple is no longer selling QuickTime Pro. If you already have QuickTime Pro, read on. If not, there is an alternative solution here: http://synchrimedia.blogspot.com/2017/02/creating-open-captions-update.html
Open captions are the better choice when the site where the movie is displayed does not support any type of captioning. An example of this is the popular Vimeo site. Since it does not support closed captioning, the captions must be made part of the video and not a separate track. If you attempt to upload a movie that has a video track, a sound track, and a text track, the text track will get stripped out on upload. What we need to do is to burn the text track into the video track.
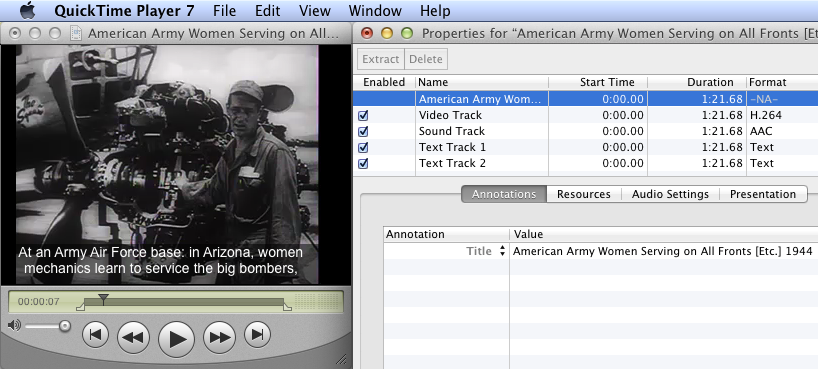
In the video below, I've used MovieCaptioner to embed a text track into a movie. Note that in this case there is actually 2 text tracks. One is for the text and a separate track is for the translucent background, which gives it better contrast than just making the text track translucent. You see when you go to the Movie Properties window in QuickTime Pro that there is a Video Track, a Sound Track, Text Track 1 and Text Track 2. If I were to upload this, the 2 text tracks would be stripped out. (Click the image to see it larger.)
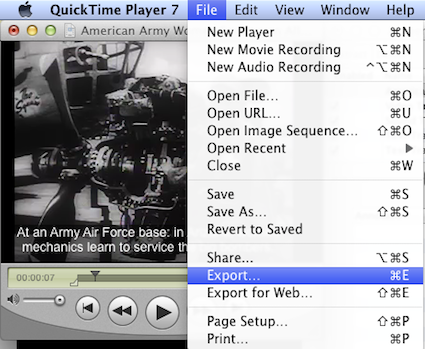
What I need to do at this point is to go to the File menu and Export to a new movie. Note that just doing a Save As will NOT do the trick. You must Export to combine the text track with the video track.
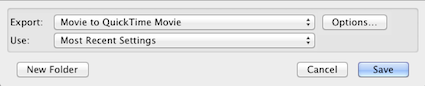
Use the Movie to QuickTime Movie option and then click the Options button to set the quality and size of your exported movie.
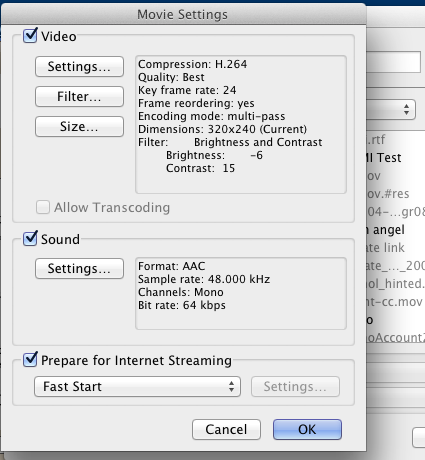
I would suggest using High or Best Quality settings with Multi-Pass encoding and not resizing the movie (use Current Size) in order to minimize any loss in quality of the movie's captions. Note that there will be some degradation in the quality since the text will no longer be vector-based like it is when it's a separate text track. If you're not worried about the file size of the movie, try using Photo-JPEG as the movie compression algorithm. It seems to produce crisp text, although the file size can be around 500 MB per minute for a movie that is 720x480. YMMV of course!
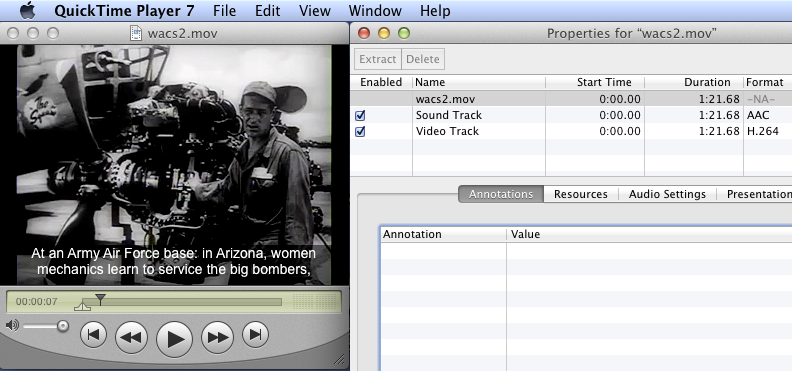
After exporting as a new movie and opening the new movie up in QuickTime Pro, I see that in the Movie Properties window I now have only a Sound Track and a Video Track, but I still have my captions and the translucent background that was added by MovieCaptioner. I can now upload this to my video site without fear of having the captions stripped out. (Click the image to see it larger.)
So you see it's pretty easy to create a movie with open captions. Hope this helps you make your videos more accessible!
Update: Apple is no longer selling QuickTime Pro. If you already have QuickTime Pro, read on. If not, there is an alternative solution here: http://synchrimedia.blogspot.com/2017/02/creating-open-captions-update.html
Open captions are the better choice when the site where the movie is displayed does not support any type of captioning. An example of this is the popular Vimeo site. Since it does not support closed captioning, the captions must be made part of the video and not a separate track. If you attempt to upload a movie that has a video track, a sound track, and a text track, the text track will get stripped out on upload. What we need to do is to burn the text track into the video track.
In the video below, I've used MovieCaptioner to embed a text track into a movie. Note that in this case there is actually 2 text tracks. One is for the text and a separate track is for the translucent background, which gives it better contrast than just making the text track translucent. You see when you go to the Movie Properties window in QuickTime Pro that there is a Video Track, a Sound Track, Text Track 1 and Text Track 2. If I were to upload this, the 2 text tracks would be stripped out. (Click the image to see it larger.)

What I need to do at this point is to go to the File menu and Export to a new movie. Note that just doing a Save As will NOT do the trick. You must Export to combine the text track with the video track.
Use the Movie to QuickTime Movie option and then click the Options button to set the quality and size of your exported movie.
I would suggest using High or Best Quality settings with Multi-Pass encoding and not resizing the movie (use Current Size) in order to minimize any loss in quality of the movie's captions. Note that there will be some degradation in the quality since the text will no longer be vector-based like it is when it's a separate text track. If you're not worried about the file size of the movie, try using Photo-JPEG as the movie compression algorithm. It seems to produce crisp text, although the file size can be around 500 MB per minute for a movie that is 720x480. YMMV of course!
After exporting as a new movie and opening the new movie up in QuickTime Pro, I see that in the Movie Properties window I now have only a Sound Track and a Video Track, but I still have my captions and the translucent background that was added by MovieCaptioner. I can now upload this to my video site without fear of having the captions stripped out. (Click the image to see it larger.)

So you see it's pretty easy to create a movie with open captions. Hope this helps you make your videos more accessible!


I'd love to see a tutorial on using MovieCaptioner with AdobeEncore for DVD authoring with captions!
ReplyDeleteI'll try to put one together. In the meantime, here is a YouTube video that may help:
ReplyDeletehttp://www.youtube.com/watch?v=nen_QhGx5Ww
Many thanks on this!! Worked like a dream.
ReplyDelete