Using Compressor to add SCC Captions to Video for Broadcast TV
Updated 5-20-18...
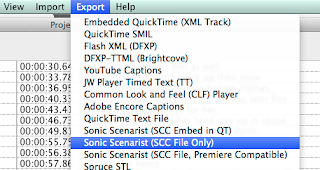
An inexpensive way to add SCC captions to your video for broadcast TV is to use Apple's Compressor ($49.95 from the App Store). After creating your captions in MovieCaptioner, export your project as Sonic Scenarist (SCC File Only). This is the file you'll use along with your movie in Compressor.
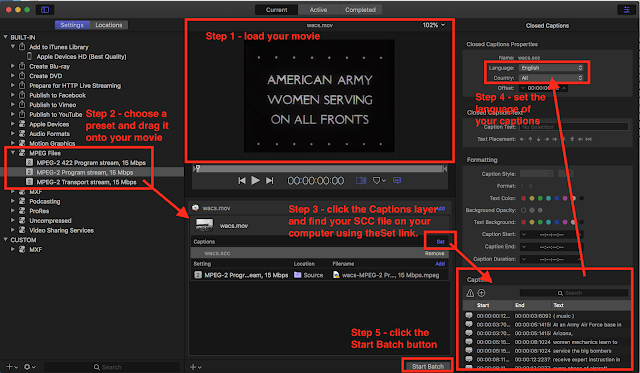
Open Compressor, then go to to the File menu and select Add File and load your movie into the interface. Then in the Settings panel, select the proper preset that your station expects you to use. Most likely it will be something like MPEG-2 Program Stream, which you'll find under the MPEG Files dropdown menu. Just drag that preset onto the movie panel where it says Add Outputs and it should stick there.
With the most recent version of Compressor (4.4), you will next see where it says Captions right under your movie and to the right of that is a Set link. Click on that and find your SCC caption file on your computer. It will have a .scc file extension. Once you load it, you should see all your caption on the lower right corner of the Compressor interface where you can make changes if necessary prior to exporting...
If you just try to export now, you'll probably get an error saying something to the effect that no language was set. Click on the Caption layer under your movie (where the Set link is) and the right-hand properties pane should change to be the Captions pane. There you'll set the language of your captions.
Once that is done the Start Batch button should be highlighted in blue. Just click that and it will render the captions to your video. Pretty easy, right? Here are the 5 steps. Click for a larger view...
Once the processing is complete, you can check to see if your captions are there by opening the new movie in VLC Player (a free video player from VideoLAN. After opening it in VLC Player, go to the Video window and select Subtitles > Closed captions 1. You may need to rewind your movie and replay it to see the captions appear.

While the captions in VLC Player will look a bit different from what you'll see on TV, that's just the way VLC displays them. They will look the way they're supposed to look when aired.
Troubleshooting
If you've followed these instructions and you don't see the captions appearing in VLC (subtitles may be grayed out), it could be that your movie contains a Timecode Track or some other tracks in addition to the Video Track and Sound Track. These may prevent Compressor from adding the SCC captions. If you have QuickTime Pro ($30 upgrade to QuickTime 7, but no longer being sold by Apple), the solution is easy. Open your movie in QuickTime Pro and go to the Movie Properties window. Select the Timecode Track (and any other tracks except the Video and Sound Tracks) and click the Delete button to remove them. Then save your movie.

If you do not have QuickTime Pro, what you may want to try is re-exporting your movie using the free app MPEG Streamclip. Exporting a new QT movie should eliminate the extra tracks so you can add the SCC captions in Compressor.
Another gotcha could be that your SCC file's timecode start time does not match that of your movie. If the movie's start time is say 01:00:00;00, then the SCC file should also start at 1 hour. If it starts at 00:00:00;00, so should your SCC file. This is easy to check in Compressor by looking at the Timing info just below the movie's info near the top of the attributes column...

In MovieCaptioner you can switch to 01 HR Start Time under the Edit menu just prior to exporting as SCC, when you're done previewing and are ready to create your SCC file.
A couple of notes...
SCC files create what are called CEA-608 captions on Line 21 of the video (often called Line 21 captions). Many networks have the capability to up-convert CEA-608 captions to the newer CEA-708 standard. Although this conversion works, it does not allow the viewer at home to change any of the text properties associate with the captions like true CEA-708 captions. To create CEA-708 captions you would need an MCC caption file. MovieCaptioner cannot currently create these, but our affiliate, East Texas Captioning can. For a nominal fee they can add the MCC file to your video for broadcast.
I don't know that a similar inexpensive solution for Windows users exists. It might actually pay you to get a Mac that can run Compressor just for this purpose.
Another option would be to purchase the HDProQT plugin for QuickTime Player from PixelTools. Cost is $1495, but it will allow you to choose your SCC or MCC file and export the broadcast video directly from any QuickTime supporting software, such as QuickTime Pro, Final Cut Pro, or Adobe Premiere.
An inexpensive way to add SCC captions to your video for broadcast TV is to use Apple's Compressor ($49.95 from the App Store). After creating your captions in MovieCaptioner, export your project as Sonic Scenarist (SCC File Only). This is the file you'll use along with your movie in Compressor.

Open Compressor, then go to to the File menu and select Add File and load your movie into the interface. Then in the Settings panel, select the proper preset that your station expects you to use. Most likely it will be something like MPEG-2 Program Stream, which you'll find under the MPEG Files dropdown menu. Just drag that preset onto the movie panel where it says Add Outputs and it should stick there.
With the most recent version of Compressor (4.4), you will next see where it says Captions right under your movie and to the right of that is a Set link. Click on that and find your SCC caption file on your computer. It will have a .scc file extension. Once you load it, you should see all your caption on the lower right corner of the Compressor interface where you can make changes if necessary prior to exporting...
If you just try to export now, you'll probably get an error saying something to the effect that no language was set. Click on the Caption layer under your movie (where the Set link is) and the right-hand properties pane should change to be the Captions pane. There you'll set the language of your captions.
Once that is done the Start Batch button should be highlighted in blue. Just click that and it will render the captions to your video. Pretty easy, right? Here are the 5 steps. Click for a larger view...

Once the processing is complete, you can check to see if your captions are there by opening the new movie in VLC Player (a free video player from VideoLAN. After opening it in VLC Player, go to the Video window and select Subtitles > Closed captions 1. You may need to rewind your movie and replay it to see the captions appear.
While the captions in VLC Player will look a bit different from what you'll see on TV, that's just the way VLC displays them. They will look the way they're supposed to look when aired.
Troubleshooting
If you've followed these instructions and you don't see the captions appearing in VLC (subtitles may be grayed out), it could be that your movie contains a Timecode Track or some other tracks in addition to the Video Track and Sound Track. These may prevent Compressor from adding the SCC captions. If you have QuickTime Pro ($30 upgrade to QuickTime 7, but no longer being sold by Apple), the solution is easy. Open your movie in QuickTime Pro and go to the Movie Properties window. Select the Timecode Track (and any other tracks except the Video and Sound Tracks) and click the Delete button to remove them. Then save your movie.

Another gotcha could be that your SCC file's timecode start time does not match that of your movie. If the movie's start time is say 01:00:00;00, then the SCC file should also start at 1 hour. If it starts at 00:00:00;00, so should your SCC file. This is easy to check in Compressor by looking at the Timing info just below the movie's info near the top of the attributes column...
In MovieCaptioner you can switch to 01 HR Start Time under the Edit menu just prior to exporting as SCC, when you're done previewing and are ready to create your SCC file.
SCC files create what are called CEA-608 captions on Line 21 of the video (often called Line 21 captions). Many networks have the capability to up-convert CEA-608 captions to the newer CEA-708 standard. Although this conversion works, it does not allow the viewer at home to change any of the text properties associate with the captions like true CEA-708 captions. To create CEA-708 captions you would need an MCC caption file. MovieCaptioner cannot currently create these, but our affiliate, East Texas Captioning can. For a nominal fee they can add the MCC file to your video for broadcast.
I don't know that a similar inexpensive solution for Windows users exists. It might actually pay you to get a Mac that can run Compressor just for this purpose.
Another option would be to purchase the HDProQT plugin for QuickTime Player from PixelTools. Cost is $1495, but it will allow you to choose your SCC or MCC file and export the broadcast video directly from any QuickTime supporting software, such as QuickTime Pro, Final Cut Pro, or Adobe Premiere.


Comments
Post a Comment