Problems with AVC Coding and Captioning
A not-so-new video encoding algorithm has a not-so-good affect on video captioning. It has caused a lot of tech questions from MovieCaptioner users who are trying to embed captions into movies. AVC Coding (Advanced Video Coding) is a commonly used video format for high definition video, and has been around since about 2003. Unfortunately this advanced format cannot be used to embed captions. What users will find is that they might (or might not) see their captions in their video, but when they go to save it they will get an error and/or the video will not save at all. Since MovieCaptioner uses QuickTime's method of adding text tracks to movies, I manually tried to add a caption track (without using MovieCaptioner) and got the same results. It simply would fail when it came to saving the movie with captions. If you're having such problems saving your captions in your movie, open it in QuickTime Pro and check the Movie Inspector window. This is one of the reasons I strongly suggest that MovieCaptioner users upgrade QuickTime 7 to the Pro version ($30 from Apple). It will look something like this if AVC Coding was used...
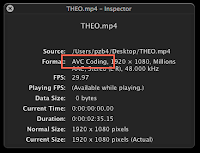 If you see AVC Coding or JVT/AVC Coding, you can probably forget about adding captions to this video. In fact, if your video uses JVT/AVC Coding it may even crash MovieCaptioner and not play in QuickTime Player. You will need to re-export your video using a different codec. If you try to use QuickTime Pro to export, however, you will find that it will not export properly. Most of the time you'll get the audio, but with a blank white video track. Not what you want. I have found, however, that the solution is to use MPEG Streamclip to re-export your movie as an MPEG-4 movie.
 MPEG Streamclip is free and is available for both Mac and Windows platforms. You can download it from the Squared5 website. Just drag your movie onto the MPEG Streamclip interface, go to the File menu and choose Export to MPEG-4. Then choose H.264 as the video compression and set the quality to 100%. It does a nice job of converting the video while maintaining quality.
 If that doesn't work, another trick is to upload your movie to YouTube, then use the Download MP4 option in Youtube's Video Manager to download a reformatted version of your movie. As long as your movie isn't too long for YouTube's time limit, this is usually a good way to do it.
 Once you have your video converted, it's time to use it in MovieCaptioner. We're going to replace the movie you tried to use before with the new one you just exported from MPEG Streamclip. Open your MovieCaptioner project and go to the File menu and choose Load Movie, then locate your new movie on your hard drive. Always work off your main hard drive and not a mounted drive with MovieCaptioner and you'll have few problems. Once you load the movie, you'll be asked to save your project again. Either save over the old project or give it a new name. Once you've done that you should be able to export with embedded captions and it should save correctly.
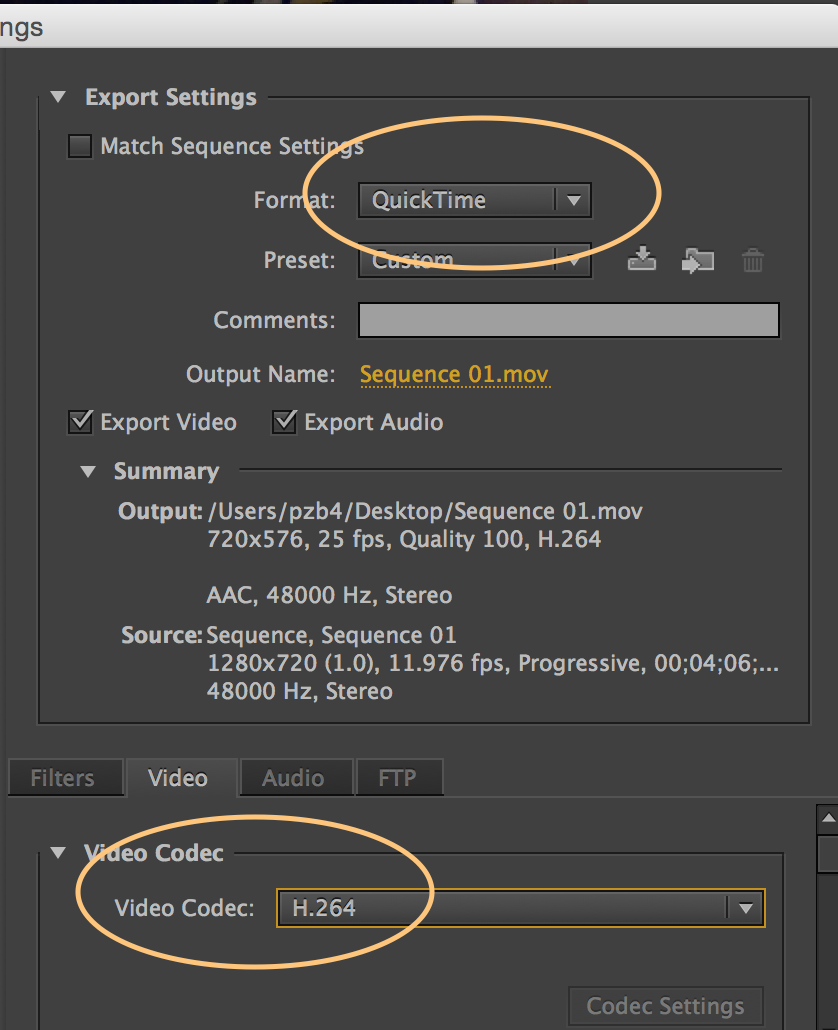
UPDATE: If you're using Premiere to export your videos, I've found that using H.264 as the video Format will save the movie with AVC Coding. However, if you select QuickTime as the Format and set the Video Codec to H.264, you can get a movie that works with MovieCaptioner right out of the gate.

 If you'd like to try MovieCaptioner to caption your movies, you can download a fully functional 14 day demo version here: http://www.synchrimedia.com. There are also some video tutorials on the Tutorials link on that page to get you up and running quickly. It requires no specialized knowledge. In fact, if you can type, you're already an expert at using MovieCaptioner. It can also work with Nuance's Dragon speech-to-text software if you'd rather talk than type.
Good luck with your video captioning. I hope this helps.
If you'd like to try MovieCaptioner to caption your movies, you can download a fully functional 14 day demo version here: http://www.synchrimedia.com. There are also some video tutorials on the Tutorials link on that page to get you up and running quickly. It requires no specialized knowledge. In fact, if you can type, you're already an expert at using MovieCaptioner. It can also work with Nuance's Dragon speech-to-text software if you'd rather talk than type.
Good luck with your video captioning. I hope this helps.


UPDATE: If you're using Premiere to export your videos, I've found that using H.264 as the video Format will save the movie with AVC Coding. However, if you select QuickTime as the Format and set the Video Codec to H.264, you can get a movie that works with MovieCaptioner right out of the gate.

Hi Patrick,
ReplyDeleteYou don't have to re-export. You can do a Save As from Streamclip. Takes 2 seconds and changes JVT/AVC to h264. It would seem that this JVT/AVC is some sort of wrapper for h264 encoding. Saw another thread where a guy simply changed the extension from .mov to .m4v to get things working. Can you confirm my Save As technique in Streamclip?
Scott,
ReplyDeleteYes, doing a save as will also work. Just choose the MP4 option from the pulldown menu. The default there is MOV, but MP4 is under that menu. Thanks for your comment. Just changing the extension to MP4 will not normally fix the AVC Coding problem.
Lot of useful points are there. Thanks for your post. I like your way of providing information through your blog. I bookmarked it and share it to friend circle.Youtube Technical Support
ReplyDelete