Creating Open Captions - An Update
Previously I wrote about how to make what are known as "open captions", that is, captions that are always on and cannot be turned off like closed captions. The process I mentioned was that you would export from MovieCaptioner as an Embedded QuickTime movie, then open that movie in QuickTime Pro and export as a new movie. What this would do is combine the separate text track with the video track so it can't be ignored. If the text track is separate, when you upload it to YouTube or some other site, the text track would be ignored and you'd just get the movie and no captions.
Unfortunately, although it still works if you currently own QuickTime Pro, Apple has decided in their infinite wisdom to stop selling QuickTime Pro for whatever reason. Since then I've been searching for a replacement and I think I've finally found something. The software is called iSkysoft iMedia Converter Deluxe. It can take the SRT caption files that you export from MovieCaptioner and add them to a movie. When you export the new movie, it combines the text with the video track just like QuickTime Pro did.
The problem I saw initially was that the text was white with a gray outline and often hard to read depending on your video. I discovered, however, that you can change the text font, color, and size, and even change its placement over the movie. Note that the placement will be the same throughout the movie. It can't be at the top on one scene and at the bottom in another.
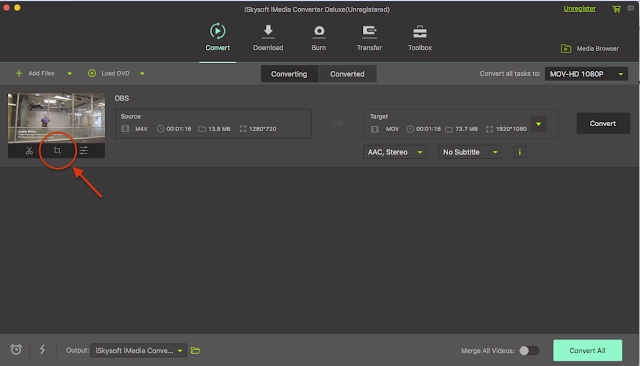
After you launch iSkysoft iMedia Converter Deluxe, just drag your movie to the interface. Then click on the little crop icon under the movie icon. We're not cropping the movie, but just gaining access to some editing tabs.
A new window will open and at the top of that window you'll see editing tabs for Crop, Effect, Watermark, Subtitle, and Audio. Choose the Watermark tab.
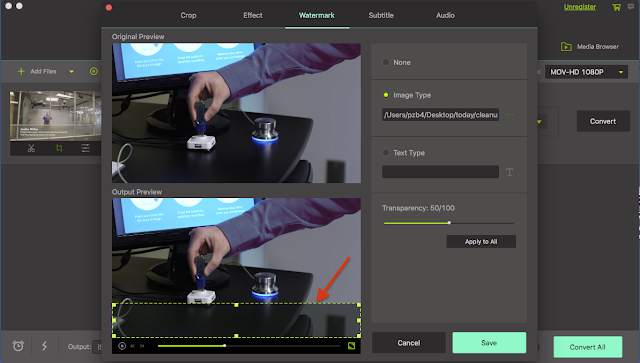
Choose the Image Type radio button then find your background graphic. Here I've just made a black bar in Photoshop and saved it as a JPEG. Here it is if you want to right-click and download it...
The transparency for the black bar can be adjusted, but I've left it at 50%. Notice after you choose your graphic, it will appear in the upper left of the Output Preview window. Drag the right side of the graphic so it fills the width of the movie and drag it to the bottom...

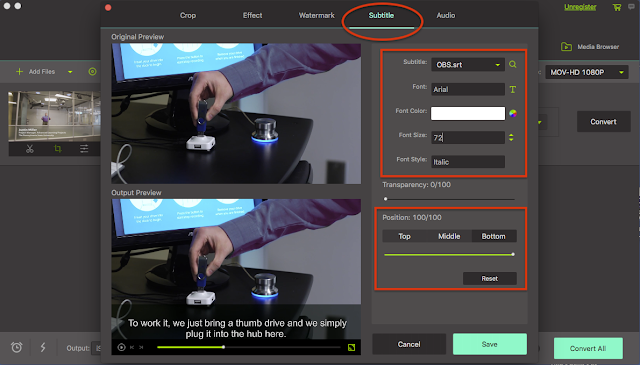
Now we'll add the SRT subtitle file by clicking on the Subtitle tab at the top of the window. There you can choose your SRT file from the Subtitle pulldown menu, your font, color, and font size. You can also tell it where you want to place the text, although I've not had much luck with changing this. You might have to leave it at the bottom and adjust if necessary once you see what the final movie looks like. You should also scroll through your movie to be sure the text is all going to fit into your black bar, too. If I had a three line caption, I might have to increase the height of my bar by going back to the Watermark tab and resizing it.

When you're done, just click the Save button. If you want to change from the default movie settings, click on the Target settings for the movie. I left it on the default MOV setting, which uses H.264 video compression and AAC audio compression. This will work for both QuickTime Player and Windows Media Player.
Just click on either the Convert button next to the Target settings or the Convert All button at the bottom of the window to create your captioned movie. Once it's done it will be in your Mac's Movies folder and inside a new folder called iSkysoft iMedia Converter Deluxe. On Windows it will be in your AppData\Roaming\iSkysoft\Media Converter Deluxe folder.
I hope this little tutorial helps you. Drop me a line if you have tried this yourself or have another solution to creating open captions. You can download a free demo of iSkysoft Video Converter from https://www.iskysoft.com. The demo will allow you to export 1/3 of your movie. Cost is currently $39.95 annually or $58.95 lifetime.

Also, give MovieCaptioner a try too. You'll find it's the easiest way to create SRT and other caption formats as well as transcripts of your movies. The transcription process is streamlined and only takes a few minutes to learn. You can download your free 14-day, fully functional demo from http://www.synchrimedia.com/downloads.html and while your there you can download a free eBook called Get Started with Video Captioning that will be helpful in learning the basics of making your videos accessible to the deaf. It is available in both iBooks and PDF formats. There is also a Spanish translation available in PDF format.
And if you have any questions, drop me a line at synchrimedia@gmail.com. I'd be glad to help you if I can.
If you'd like to buy Video Converter, you can use this direct link: https://shopper.mycommerce.com/checkout/cart/add/16339-10?affiliate_id=622274
I liked it so much I became an affiliate!
The direct link to buy MovieCaptioner is here: http://www.synchrimedia.com/buy_moviecaptioner.html
Unfortunately, although it still works if you currently own QuickTime Pro, Apple has decided in their infinite wisdom to stop selling QuickTime Pro for whatever reason. Since then I've been searching for a replacement and I think I've finally found something. The software is called iSkysoft iMedia Converter Deluxe. It can take the SRT caption files that you export from MovieCaptioner and add them to a movie. When you export the new movie, it combines the text with the video track just like QuickTime Pro did.
The problem I saw initially was that the text was white with a gray outline and often hard to read depending on your video. I discovered, however, that you can change the text font, color, and size, and even change its placement over the movie. Note that the placement will be the same throughout the movie. It can't be at the top on one scene and at the bottom in another.
After you launch iSkysoft iMedia Converter Deluxe, just drag your movie to the interface. Then click on the little crop icon under the movie icon. We're not cropping the movie, but just gaining access to some editing tabs.
A new window will open and at the top of that window you'll see editing tabs for Crop, Effect, Watermark, Subtitle, and Audio. Choose the Watermark tab.
Choose the Image Type radio button then find your background graphic. Here I've just made a black bar in Photoshop and saved it as a JPEG. Here it is if you want to right-click and download it...
The transparency for the black bar can be adjusted, but I've left it at 50%. Notice after you choose your graphic, it will appear in the upper left of the Output Preview window. Drag the right side of the graphic so it fills the width of the movie and drag it to the bottom...

Now we'll add the SRT subtitle file by clicking on the Subtitle tab at the top of the window. There you can choose your SRT file from the Subtitle pulldown menu, your font, color, and font size. You can also tell it where you want to place the text, although I've not had much luck with changing this. You might have to leave it at the bottom and adjust if necessary once you see what the final movie looks like. You should also scroll through your movie to be sure the text is all going to fit into your black bar, too. If I had a three line caption, I might have to increase the height of my bar by going back to the Watermark tab and resizing it.

When you're done, just click the Save button. If you want to change from the default movie settings, click on the Target settings for the movie. I left it on the default MOV setting, which uses H.264 video compression and AAC audio compression. This will work for both QuickTime Player and Windows Media Player.
Just click on either the Convert button next to the Target settings or the Convert All button at the bottom of the window to create your captioned movie. Once it's done it will be in your Mac's Movies folder and inside a new folder called iSkysoft iMedia Converter Deluxe. On Windows it will be in your AppData\Roaming\iSkysoft\Media Converter Deluxe folder.
I hope this little tutorial helps you. Drop me a line if you have tried this yourself or have another solution to creating open captions. You can download a free demo of iSkysoft Video Converter from https://www.iskysoft.com. The demo will allow you to export 1/3 of your movie. Cost is currently $39.95 annually or $58.95 lifetime.

Also, give MovieCaptioner a try too. You'll find it's the easiest way to create SRT and other caption formats as well as transcripts of your movies. The transcription process is streamlined and only takes a few minutes to learn. You can download your free 14-day, fully functional demo from http://www.synchrimedia.com/downloads.html and while your there you can download a free eBook called Get Started with Video Captioning that will be helpful in learning the basics of making your videos accessible to the deaf. It is available in both iBooks and PDF formats. There is also a Spanish translation available in PDF format.
And if you have any questions, drop me a line at synchrimedia@gmail.com. I'd be glad to help you if I can.
If you'd like to buy Video Converter, you can use this direct link: https://shopper.mycommerce.com/checkout/cart/add/16339-10?affiliate_id=622274
I liked it so much I became an affiliate!
The direct link to buy MovieCaptioner is here: http://www.synchrimedia.com/buy_moviecaptioner.html


There's a $6 Mac program called MP4Tools by EmmGunn software that will let you "burn" the captions into your video as well. It doesn't offer any controls for fonts, but it works great and you can't beat the price!
ReplyDeletePerhaps I did something wrong, but it would not put Hard (burned) subtitles into the movie. The only option was Muxed (soft) subtitles and although they played when I hit the Play button in the app, the captions failed to play in QT Player (both 7 and X) despite enabling subtitles. There was a subtitle track, but no subtitles would display. This was using an SRT caption file.
DeleteThanks, Daniel. I will check it out.
ReplyDeleteAnother good option to create open captions would be VideoGo by IdealShare. Here is the link: http://www.idealshare.net/how-to-add-subtitles-to-avi.html
ReplyDeleteNice tips on open captions need to try.
ReplyDeleteCheck out https://www.transcribe-now.com