Synchronizing Transcripts to Your Video the Easy Way
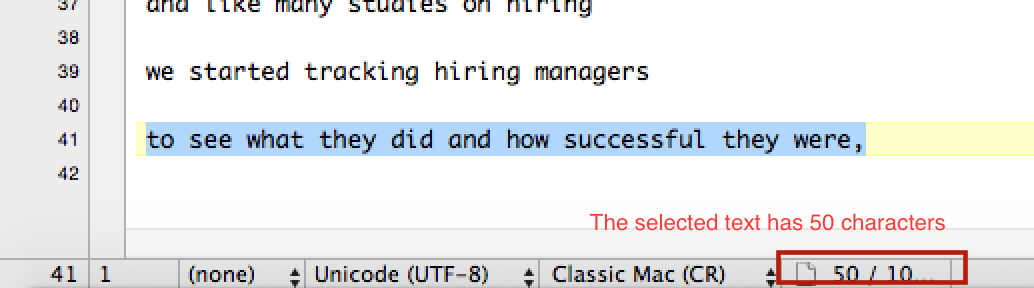
Let's say you already have a text transcript of your movie and you need to synchronize it. First you'll need to break them up into readable chunks if they aren't already. You'll put carriage returns in the break them into separate captions on each line. Something like 50-60 characters or so looks good usually. You can use your text editor's built-in character counters to get you in the ballpark.

Once you have your transcript broken up line by line into captions, you're ready to synchronize it. Make sure it is a plain text file and it has a ".txt" file extension.
Open MovieCaptioner and load your movie. You'll be asked to save your project right away after importing your movie.
Then go to the Import menu and select Text in Line Form.

This will tell MovieCaptioner to treat each separate line as a different caption. Once the transcript is imported, you'll see the Set Timecode button appear at the top of the interface (or access it via the View menu). If you haven't used this feature yet, see this video:
Using MovieCaptioner to Synchronize Imported Transcripts
It may take you a little practice, but it will get the timing dead on.
This works great, but what if you have a very long movie? Is there a shortcut? Indeed there is! First, you may need to increase your limit with YouTube. You can do this by verifying your email. You will also need to own the movie you are uploading (according to YouTube). The maximum you can upload to YouTube will be 128GB or 11 hours long. Hopefully your movie isn't THAT long!
Then use YouTube's Upload button to upload your video. You can set the viewing privileges to Private if you don't want anyone to see it on YouTube.

After uploading your movie, go to the Video Manager and find your movie's Edit pulldown menu. Select Subtitles and CC from the pulldown menu.

Click the Add New Subtitles or CC button on the next page.

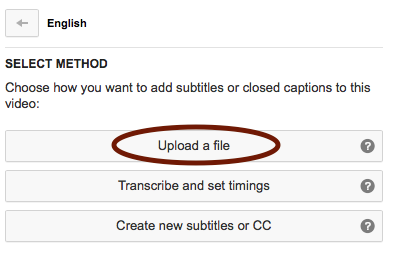
Choose your language. From here you'll have 3 choices: Upload a file, Transcribe and set timings, and Create new subtitles or CC.

Choose Upload a file, then select Transcript (since you don't have timecode yet). Use the Choose File button to find the transcript on your computer. Then click the blue Upload button.

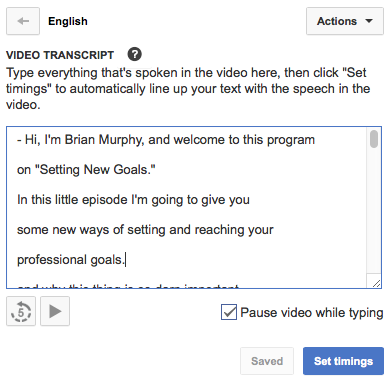
You'll see your transcript appear in the window. Now simply click the Set timings button and go to lunch.

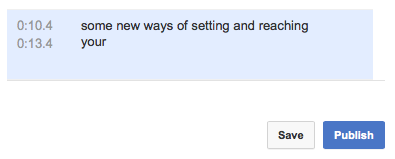
The auto timing will of course depend on the length of your video, but it doesn't take too long usually. You should eventually see your captions with timecode to the left of each one. Now there's one more step - click the Publish button to make them available to the movie. This will make the CC button appear on the playbar of the movie.

If YouTube was your final destination, congratulations - you're done! But what if you need to create a file for some other use such as a DVD or broadcast captions? It's simple. Just go back to the Subtitles and CC window where you uploaded them and click on the language that you selected before you uploaded the transcript.
 You'll see the captions listed again, but just above it on the right you'll see a button called Actions. That is a pulldown menu where you'll select the type of file to download. Choose .srt. It will save the captions as a file to your computer with the timecode.
 Then you can open a new MovieCaptioner project, load your movie, then go to the Import menu and select Subrip SRT. Find the SRT file you downloaded from Youtube and it will just suck the captions and timecode right in. Then you can export it as whatever caption format you want!
 Hope this saves you some time if you already have transcripts. If you don't, MovieCaptioner can help you create them and when you're done creating them you won't need YouTube to synchronize them. The timecode will be there ready for you to export to many different caption formats. Give MovieCaptioner a test spin today. The demo version is fully functional for 14 days and I'd be glad to help you with any questions you might have.
Once you have your transcript broken up line by line into captions, you're ready to synchronize it. Make sure it is a plain text file and it has a ".txt" file extension.
Open MovieCaptioner and load your movie. You'll be asked to save your project right away after importing your movie.
Then go to the Import menu and select Text in Line Form.

This will tell MovieCaptioner to treat each separate line as a different caption. Once the transcript is imported, you'll see the Set Timecode button appear at the top of the interface (or access it via the View menu). If you haven't used this feature yet, see this video:
Using MovieCaptioner to Synchronize Imported Transcripts
It may take you a little practice, but it will get the timing dead on.
This works great, but what if you have a very long movie? Is there a shortcut? Indeed there is! First, you may need to increase your limit with YouTube. You can do this by verifying your email. You will also need to own the movie you are uploading (according to YouTube). The maximum you can upload to YouTube will be 128GB or 11 hours long. Hopefully your movie isn't THAT long!
Then use YouTube's Upload button to upload your video. You can set the viewing privileges to Private if you don't want anyone to see it on YouTube.

After uploading your movie, go to the Video Manager and find your movie's Edit pulldown menu. Select Subtitles and CC from the pulldown menu.

Click the Add New Subtitles or CC button on the next page.

Choose your language. From here you'll have 3 choices: Upload a file, Transcribe and set timings, and Create new subtitles or CC.
Choose Upload a file, then select Transcript (since you don't have timecode yet). Use the Choose File button to find the transcript on your computer. Then click the blue Upload button.
You'll see your transcript appear in the window. Now simply click the Set timings button and go to lunch.
The auto timing will of course depend on the length of your video, but it doesn't take too long usually. You should eventually see your captions with timecode to the left of each one. Now there's one more step - click the Publish button to make them available to the movie. This will make the CC button appear on the playbar of the movie.
If YouTube was your final destination, congratulations - you're done! But what if you need to create a file for some other use such as a DVD or broadcast captions? It's simple. Just go back to the Subtitles and CC window where you uploaded them and click on the language that you selected before you uploaded the transcript.


Hi, your
ReplyDeleteHi youtube video re importing transcript is not found. The link goes to "Finetuning..." Having problems setting time code from the script I imported in line form to a video that needs a delay at the beginning while organization's logo is shown and then cuts to speaker. Thanks,
ReplyDeleteRenee
I had not created one on importing transcripts, but I'm working on creating all new video tutorials that are a little more bite-sized covering each topic. Could you send me an email including the file you're importing and a little more detail on what you need to do? Send it to "synchrimedia@gmail.com" and I'll be glad to help you. It is possible to offset the time if necessary.
ReplyDelete