Adding Closed Captions to Facebook Movies
Did you know that Facebook supports closed captioning? Here's how to do it.
First, you will need to create your captions using MovieCaptioner or some other software. Export as SRT, the same caption format that YouTube uses.
Once you have your caption file ready, upload your movie to Facebook by clicking the Add Photos/Video link on your status.
Click the blue Post button. Your video will begin to upload. After your video is done uploading, you should get a "Processing" alert that will give you the option to Edit your movie.
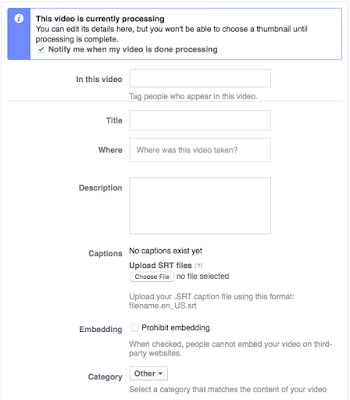
Click the Edit Video button. It will take you to this page where you can set the description, privacy, date, and other information associated with your video.
If you didn't see the Processing alert, you can always click the Options menu on your video's page and select Edit this video from there.
Scroll down to where it says Captions on the Edit page. Note the naming convention you'll need to use for your SRT file. Mine says to use "filename.en_US.srt", so I had to add ".en_US" before the ".srt" on my file prior to uploading it. If you don't use that naming convention, you may get an error when you save it. That happened to me before I noticed that I needed to change the name.
Click the button to upload your SRT file, then click the Save button at the bottom of the page and you're done! Now if the captions are not appearing when you play the movie, just click the little cog wheel icon on the video's playbar and check the Captions option.
If you need an easy way to create SRT files for Facebook videos, give MovieCaptioner a try. You can download the fully functional demo to use for 14 days from http://www.synchrimedia.com/downloads.html.


Have you tried iDealshare VideoGo which can add subtitles to AVI, MP4, MKV, WMV, MOV etc on Mac or Windows.
ReplyDeleteHere is the easy guide at http://www.idealshare.net/how-to-add-subtitles-to-avi.html
VideoGo looks like a good solution for Open Captions. These are captions that are burned into the video layer so they're on all the time. With Facebook captions in the SRT format, they can be toggled on and off, so that might be preferable to most viewers. See my post on Open Captions. http://synchrimedia.blogspot.com/2017/02/creating-open-captions-update.html
ReplyDelete